Saturday, February 18, 2006

Colourful Epoxy

Martin brought over my newly purchased fiberglass cloth (West Systems glass: 14 yds of 4 ounce, 14 yards of 6 ounce), epoxy (West Systems 105 resin + 207 hardener), and two types of fillers (WS 406 & 407). The fillers are mixed in with the epoxy to change the thicken it and comes in a variety of types for different functions.

The 406 filler is "colloidal silica" adhesive filler, particularly good for gluing things together (like laminated stems), and is made of extremely small particles of silica. It was available in two sizes, 1.7 ounce or 5.5 ounce. Well 1.7 oz doesn't sound like a heck of a lot for something you mix in by the handful to thicken a batch of epoxy so I figured I'd better get the larger size. Well I now own a tub of colloidal silica. This stuff is light! It looks like very fine, very light, white snow. It literally floats out of the container on it's own when you open the lid.

The 407 filler is the "low density fairing filler" and is intended for filling gaps or hollows and can be sanded easily and isn't heavy. It's also purple. Here's how West System describes it:
407 Low-Density filler is a blended microballoon-based filler used to make fairing putties that are easy to sand or carve. Reasonably strong on a strength-to-weight basis. Cures to a dark red/brown color.
Sounds like it should be perfect and blend fairly well with the darker wood on the kayak to fill all those gaps where my joints weren't perfect right? Perhaps if my boat was built of purple heart.


In order to have some idea of how the epoxy and fillers could be combined to get a variety of colours to match the wood on my boat I mixed up a few batches in different combinations to see what shades I can come up with. I also collected half a large peanut butter container of the dust left over from the sander. The problem with using wood flour is that it continues to absorb epoxy after it's mixed to the desired consistency, it ends up being heavy and hard to sand because the fibers are saturated with epoxy, and it has a colour much darker than the original wood.

The silica in the mix seems to give everything sort of a silvery hue. The 406 has quite a yellowish appearance when mixed with the epoxy and this will actually probably match fairly well with the yellow cedar at the front of the deck. In order to match the rest of the wood I'll probably end up using mostly 406 with a bit of wood flour mixed in for the brown colour, and a very small amount of the 407 stuff in areas that are a bit darker. Flour can also be used as a an additive to lighten the colour so I might play with this a bit too; maybe rye flour would have a bit of brown colour?

The putties mixed for the above picture were all about the consistency of peanut butter or a bit thinner. It's interesting that the 407 filler gives a much smoother texture than the mixes that include the 406 silica.

Friday, February 17, 2006

A Boat With A Hole In It

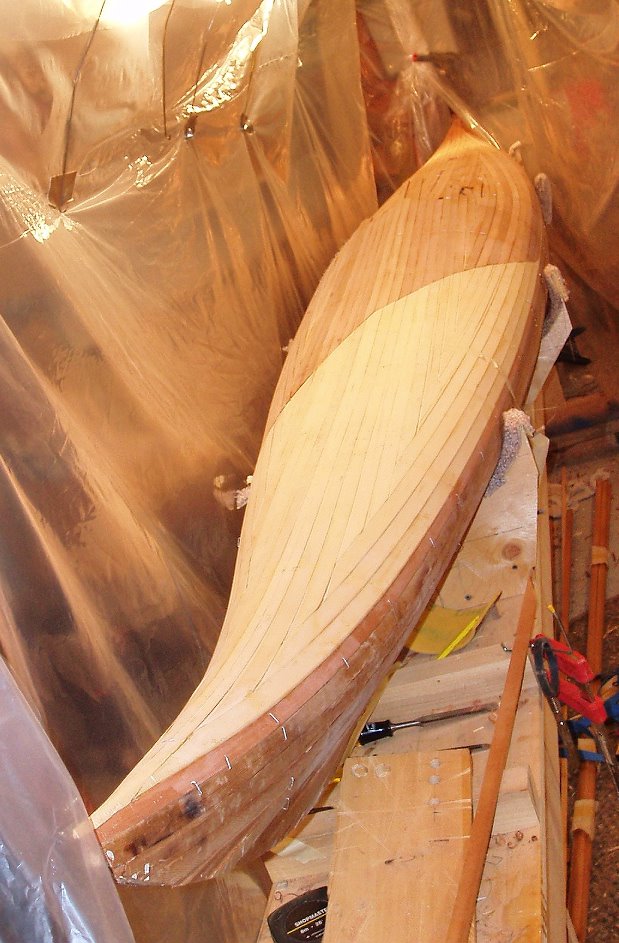
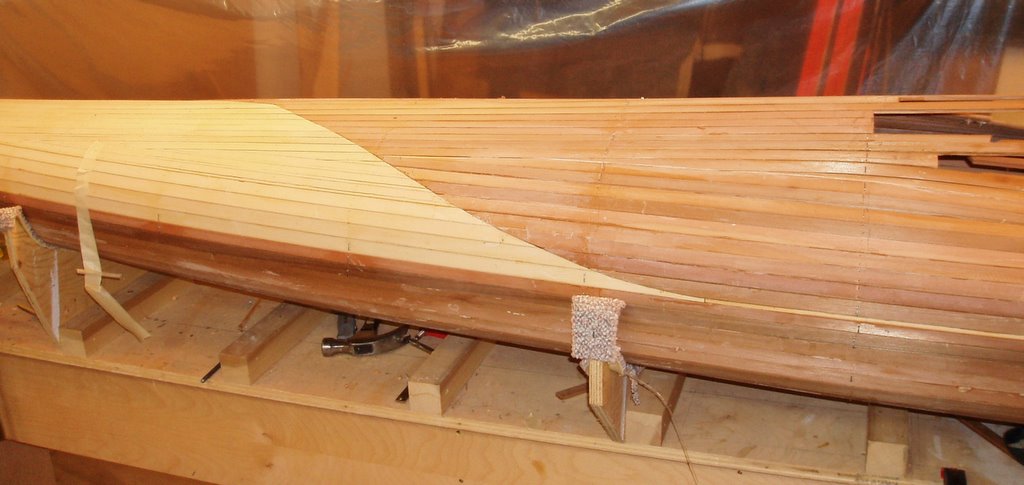
On Wednesday night I got the deck planed and sanded fairly smooth (fair) and also cut out the hole for the recessed cockpit. (To see what the cockpit recess on this kayak should look like, have a look at the one John Caldeira did on his, it's a great excuse to have a look at his beautiful Guillemot kayak.)

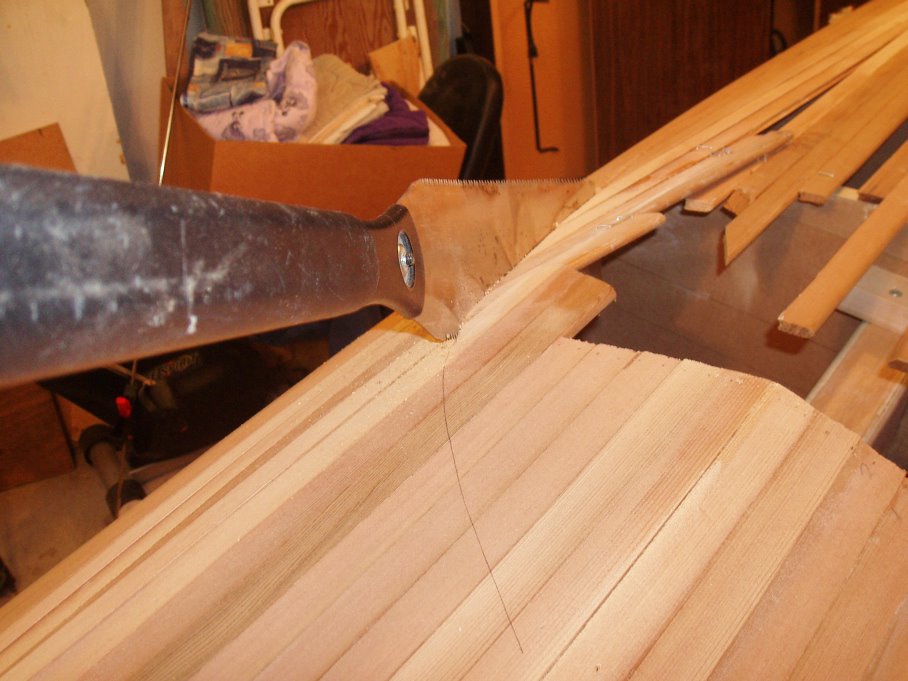
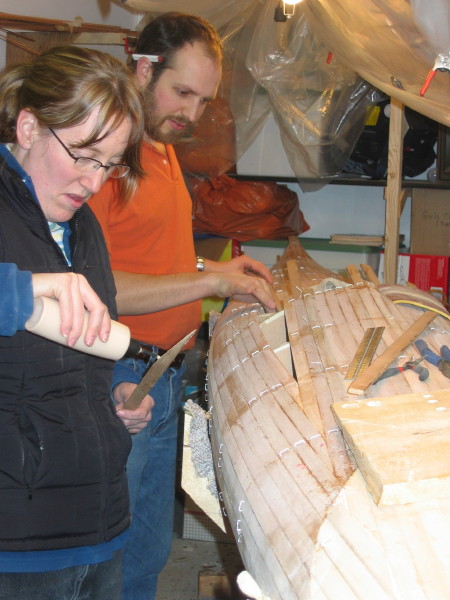
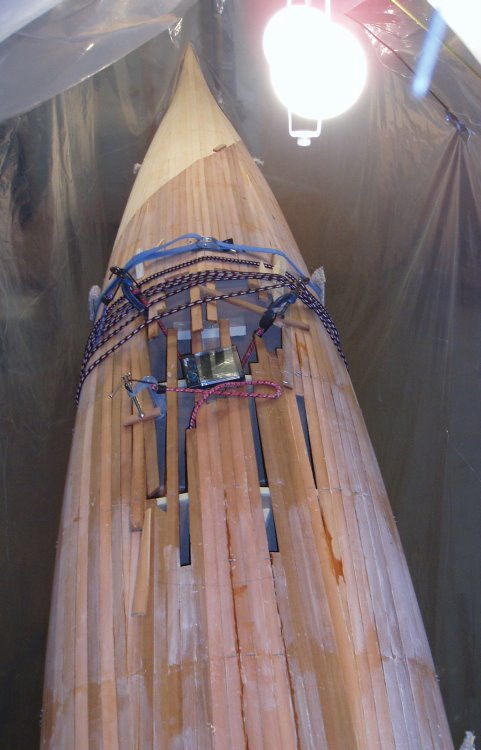
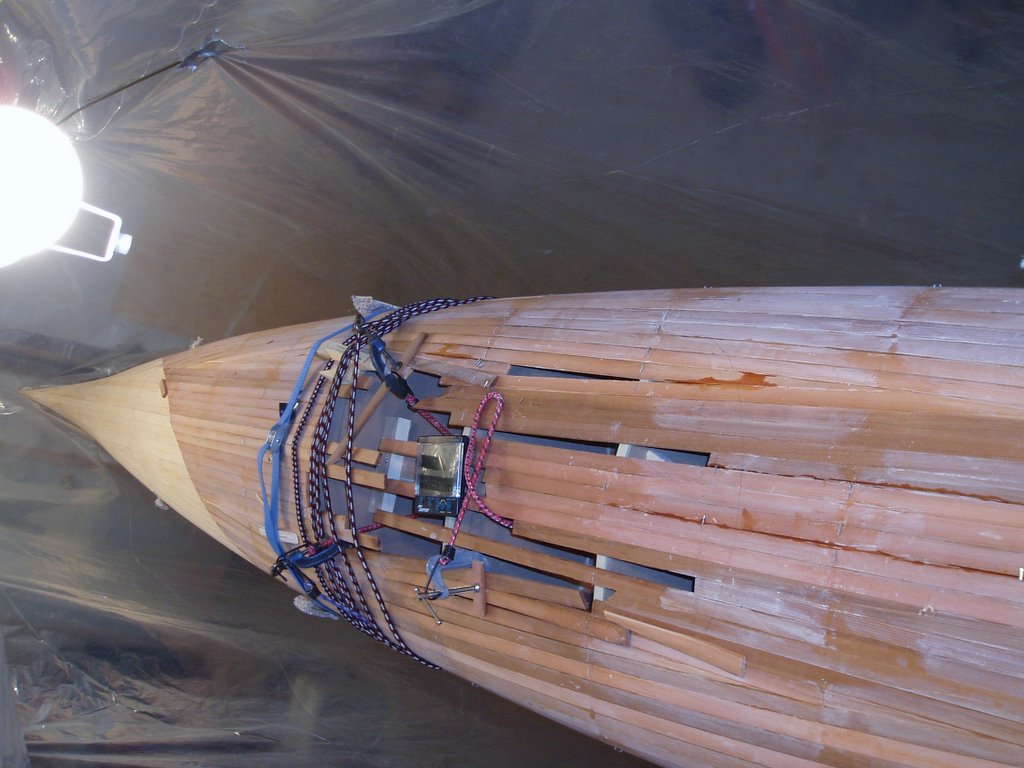
The line was first marked onto the deck in pencil following a half template cut from 1/8" hardboard. A half-template is a template which is only half of the opening and is then flipped over to do the other half. This helps to assure that the two sides are actually symmetrical and prevents the appearance of any errors in the way the curves are drawn between the two sides (the template is drawn from a set of "offsets which are essentially a series of x & y coordinates then you connect the dots to get the full shape). I was initially a bit timid about how to get the flat template to lay properly on the deck which is highly curved in in this particular spot. Should I push it down and force it to conform to the shape of the deck as best I can, or allow it to sit flat and just trace straight down from the edge of the template, even though it may sit 5" or more above the kayak in places. I eventually decided it probably doesn't matter too much and stapled the template down to the deck in a couple of spots to ensure it didn't shift on me, curving it to follow the contour of the deck somewhat but not forcing it down anywhere. I then held my pencil fairly vertical and traced around the template. I then flipped it over and repeated for the other side.

The hole was cut just slightly to the inside of the line, to be trimmed to the line later with sandpaper, chisels, etc. The cut was started using a broken off hacksaw blade clamped in vice grips. This narrow blade allowed for a very thin kerf and was able to cut a fairly tight radius around the corner. Once around the corner at the back of the cockpit, I switched to the japanese pull saw (shown in the pictures) to cut the more gently curving portions.
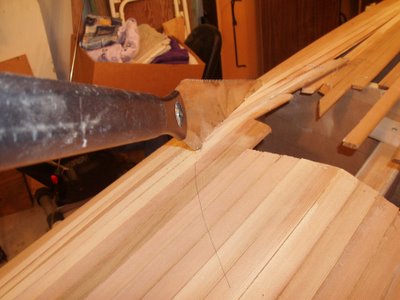
The hacksaw blade in vice grips saw worked OK, but it wasn't terrific. Also the japanese saw worked well, but wouldn't work for anything more than a gentle curve. Cutting the recess (and later the actual cockpit opening) is a trial in advance of cutting hatch openings later on. Cutting the hatches will require something able to cut a smooth line and follow a curve well. Often a power jig saw is used, but I have some misgivings about using my hand-me-down 30 year old saw for this purpose, or any other power tool for that matter. In my experience, nothing screws up a project faster than trying to save a bit of time using a power tool. I think then, that this little saw (or this one) from Lee Valley Tools might be just the ticket.It would allows for a thin kerf, the fine and easy cut of a japanese saw, and it's narrow and would have no problem cutting the oval shape of a hatch. At $18 it's not prohibitive either. I think I will get this saw now, but I just wanted to rule out a couple of options first (one more option to try would be to use a fine tooth jigsaw blade in the vicegrips). I also think small saw like this would have been handy for rough cutting strips while stripping the kayak.

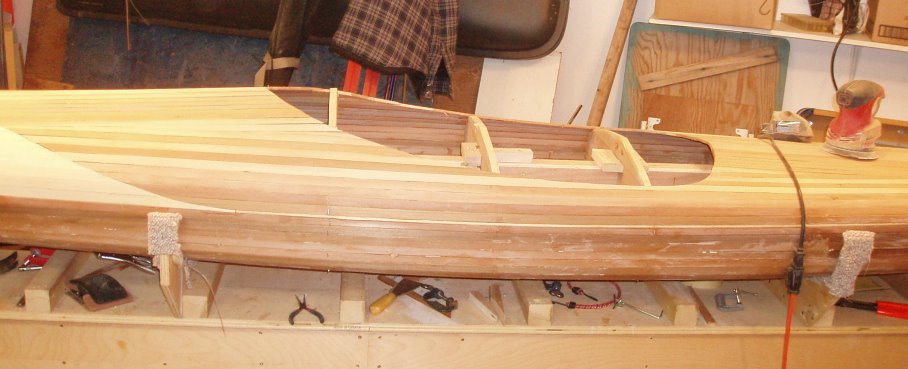
Here are a couple more photos of the cut out cockpit recess.
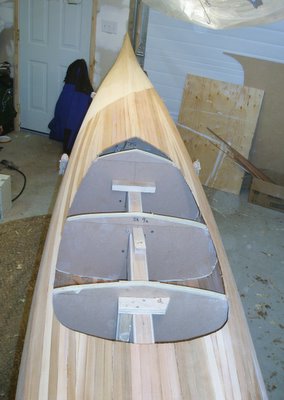
Looks nicer with a hole in it doesn't it?

Now I have to fill that hole back in, at least partially so that there is a couple of inches worth of wood all the way around the outer edge. The difference from what was cut out is that the pieces that are put in will go in horizontally across the opening such that they sit parallel to the floor on a flat curve from the peak at the front to the sides where it is lowest then up just a bit at the back (that second last picture above should help to visualize this). The tops of the forms in the recess area have now been broken away (they were pre-cut then hot-glued back in place prior to stripping) so that they are out of the way for the building of the recess. Once that recess has been stripped, I can cut out the hole for the actual cockpit opening (actually that probably won't occur until after the deck has been glassed on the outside).

After I had planed off the high points, I started up the sander with 80 grit paper just to see how that goes. I never bothered with the dust mask or connecting the shop-vac up to collect the dust because I was only going to be sanding for a couple of minutes. Well I ended up doing a fair bit of sanding, the whole deck in fact. It took me about an hour or so. I figured there wasn't much dust being kicked up so I didn't worry about the mask, even though I know that wood dust isn't very good for the lungs, and cedar dust is the worst. After being at it for a while I looked up across the room and realised that the air was full of dust. When I went to bed later that night I began to hack and cough, and it got worse the next day. 48 hours later and I think I'm nearly back to normal (I am/was on the tail end of a cold so it is a bit difficult to say what's due to dust and what's due to virus). Of course the next day in the lab Justin, a lung function specialist with whom I share lab space, noticed the hacking cough and after my explanation admonished me for my foolishness. He's right of course. Ever wonder why people use cedar chests to store quilts and long term clothes storage, or use cedar inserts in dresser drawers to ward off insects? It's because cedar trees have gotten very good at producing chemicals that some insects aren't particularly fond of. And your lung epithelial lining isn't particularly fond of it either. Even without the toxic compounds, it's probably not particularly good to have these extremely fine fibers (the small size of the dust allows them to get into the deepest cavities of your lungs) irritating your alveoli (remember, Justin's the expert on that stuff not me). But (cough) I digress.
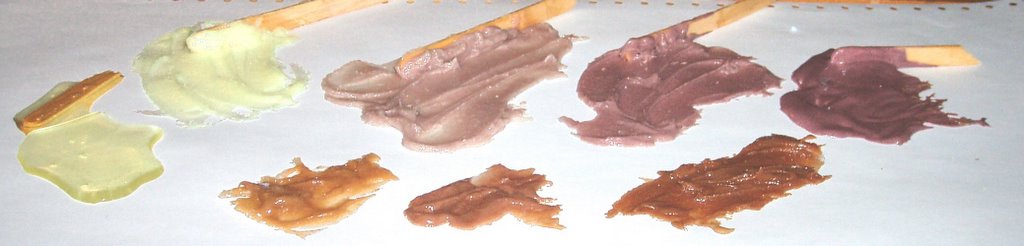
Monday, February 13, 2006

Deck Completed

I had some help from my wife last weekend fitting some of the final strips on the kayak deck. Here are a couple of photos of her working on her boat for the first time.

Here's a picture of my main helper, Kaya:

I recently set up a tent over the kayak to keep things a bit warmer over the boat without having to keep the whole garage warm. I ran a rope from one corner to the other to hold a plastic sheet over the boat, then ran a string of lights under the tent to throw some heat in the enclosure. Wire hangers with the bottom cut and spread apart are being used to spread the plastic away from the lights (credit for that idea goes to Paul G Jacobsen). The plastic is sealed up at the ends with a few clips and the lights are plugged in. Six 100 watt bulbs keeps it about 12C under the tent while it is about 0C in the garage (and -15C outside). That's better than keeping the 4800 watt heater on until the glue cures. In order to work on the boat I raise the plastic and fold it up over top of the whole apparatus and add a couple of clips to keep it there. It's not too annoying to work under but if I were any taller I'd want to raise it more. The lights are also helpful to work by.

The final strips over the deck around what will become the cockpit opening proved to be rather difficult. Those last 4 strips were buggers because they are so short and they twist so much, with not much to actually attach them to. A little heat and lots of bungees, staples, clamps and a couple of nails helped to get them in place and hold them there.


I then pulled most of the staples from the deck. I had a major "Oh Sh*t!" moment when I pulled the last staple from a region of the deck just behind the cockpit. A section three strips wide and ~2 1/2 feet long broke free from the deck along the glue joints, but remained attached on the end. I had been pulling the staples by using a pliers and simply yanking the staples straight out. I hadn't realised that the staples actually had a pretty good hold on the cedar they go through and that hold proved stronger than the glue and wood on the back deck. I was able staple it back down and glue the piece back in place using cyanoacrylate glue (a thick version of Krazy Glue). It should be OK now, but I was more careful removing the rest of the staples, choosing to pry them out with a screwdriver rather than yanking with pliers.
Here's a couple more pictures with all the strips in place, no bungees or staples.


Next, I need to cut out the opening for the recessed cockpit and plane, scrape & sand the deck until it's smooth and fair. Once that's done I'll flip the boat back over and put the hardwood stems onto the ends of the hull then repeat the fairing process on the hull. But, first I have to get over this cold.

Sunday, February 12, 2006

History Lesson

Apparently my interest in boats goes back for at least a couple generations. Here is a picture from the 1940's of my Great-Grandpa George Pelletier seemingly going hunting. I would guess that this would have been somewhere in the region of northwestern Quebec or northeastern Ontario. Check out that portage cart!

This next picture is labeled as 1949 so perhaps it was taken at the same time as the one above. This picture features Grandpa Ken Bryson on the left. That must be my Great-Grandpa & Great-Grandma (mamere) Pelletier in the middle, and maybe one of my Grandma's younger brothers on the right.

I'm not too sure about the next one, perhaps it's Grandpa Bryson & Great-Grandpa Pelletier again. Isn't that canoe a beauty?

Here's another one of Grandpa Bryson.Later on Grandpa Bryson moved up a bit in his choice of boats. Here is a picture from 1979 when he lived on Vancouver Island at Campbell River.

Thursday, February 09, 2006

Weight vs Strength and Which Fiberglass Cloth to Use

Light but Strong - Building Cedar Strip Canoes for Wilderness Tripping

Since I have to order my fiberglass now, I am considering which weight or weights of glass cloth to use. The standard is 6 oz. However the article linked above from Nessmuking.com and recent posts on the kayak builder's forum have me considering the use of a lighter weight glass in an effort to save some weight. By using 4 ounce glass rather than 6, I am putting only 2/3 as much glass on in any single layer and am also only using about 2/3 as much epoxy (well, it should use significantly less epoxy anyway). Of course there is a penalty, and that comes in the form of strength. A layup using 4 ounce glass will not be as strong as that using 6 ounce. This begs the question, is the extra strength really necessary? Maybe not, according to the article above. The suggestion has been made in the article and by other builders, that these boats are often over-built, adding weight which is unnecessary for a boat's intended use.

The weight and strength considerations for this kayak are:

  • * It must be light enough for my wife to easily handle on land to and from the water, by herself, whether it is over a portage or from the car to the water.
  • * It must be durable enough to live through trips on the Canadian shield. This means it must be strong enough to bounce off of the occasional rock in moving water (no, not whitewater), and it must withstand the abrasion of carefully landing on a rocky shore.

Unfortunately these two factors are opposing in their build requirements. However, I think I can come to some compromise to satisfy both conditions.

After discussing this matter a bit with Martin, I am thinking of following his suggestion of using 6 once glass on the hull, and 4 ounce on the deck where there will be less abrasion and the extra impact resistance is not absolutely necessary (unless of course one finds themselves travelling upside down descending a rocky set of rapids, but then there will be other things to be concerned about rather than the integrity of the deck). Certain areas of the deck will still be re-enforced with additional fiberglass layers to strengthen the region around the cockpit. Since I probably want a second layer of fiberglass on the outside of the hull for abrasion resistance, perhaps doing the whole outside hull in 4 ounce, then adding a second layer of 6 ounce to the just the bottom "football" area would be a good compromise, or I could do it the other way around. I think I'll keep 6 ounce on the inside of the hull to aid in impact resistance.

Have some thoughts or insight on this? Leave me a comment.

By the way, I finshed stripping the deck on Wednesday night. I'll post some pictures soon. Those last strips that go over the peak of the coaming were buggers to get in the right spot because they have a large amount of twist in them and becuase the pieces are very short. But, they're in now. Next, I have to cut out the opening for the cockpit recess. I also pulled a bunch of the staples from the deck. I've just been yanking them straight out with pliers and while pulling the last staple in a big section of the rear deck, a whole section of the rear deck broke free when I yanked out the staple! Holy F*)&%! A section 3 strips wide by about 14" long behind the cockpit just lifted up, breaking at the glue lines. I used thick crazy glue (thin enough to get into the seams better than wood glue, I think) to put it back in place so hopefully now it stays there. My lesson for the night: staples do have some holding power on the thin cedar.

I'll post some pictures of the completed deck soon.

Thursday, February 02, 2006

Tony Olsen on Clamps

Tony Olsen's Kayak Bytes - Hatch flanges: I found an interesting statement on Tony Olsen's blog: "You can never have too many clamps no matter what your wife says." See Dear, Tony says so too! Tony is building a "modified Great Auk". Previously, Tony also built this very nice Guillemot.

Tony must be right; just to see what happened when I Googled the phrase "never have too many clamps" and got 2.47 Million hits! Add "kayak" to the search phrase and you get this, this, this (another Guillemot), this (that's an intersting one, incuding a very unusual photograph of the builder at work), this, this, and many more. That actually turned out to be a very interesting exercise since I found a whole bunch of kayak building web sites I'd never seen before.