Kayak progress has been pretty much stopped lately. Between sickness (the whole family seems to be just continuously cycling through colds), work, and getting our house ready to sell I haven't done a thing on the boat in about 2 weeks. We bought a house last week (20'x24' attached garage with 10' ceilings, insulated and drywalled - I need to add lots of light, lots of power, a source of heat and I'll have a boatbuilding shop ready to go) so now I have to finish all sorts of things around our house and get it ready to sell. We've gotten a lot done on that front over the last couple of weekends so the list is getting shorter. Then I'll have to clean up the shop and make it presentable.
By the way, if you want to buy a boatbuilding workshop (220V, lots of light, electrical outlets every 6', insulated, drywalled) with nice yard and detached house, let me know!As you see it in my
previous posts is pretty much how the kayak sits right now. I'm not in super big hurry right now anyway since the next few steps involve epoxy so I'll have to warm it up and keep it warm for a period. Thus, I want to wait until it's a bit warmer outside and also where I can do a lot of work on it in a single stretch. Aside from the actual fiberglass work, I need to fill all the gaps and I'll use a epoxy putty mixture to do that with. I also need to attach hardwood stems which will be glued in place with epoxy (though I could use a polyurethane glue or another glue).
Right now I'm 1/3-1/2 way through filling in the cockpit recess, a flatish area (curves in only 2 dimensions instead of 3) where the cockpit hole will eventually be cut and it's proving to be a PITA because it takes time to properly fit all the short horizontal strips just so without a gap. I was considering using a chunk of thin plywood (walnut or mahogany or luan?) and bending it in place to fill the recess much as would be done for a
stitch & glue kayak, but I decided to do it the way
the book said since I am too cheap to go buy plywood and preferred to use up my scraps of cedar. Now I'm wishing I had used the plywood. If I had gotten the ply, I would also use it for the whole cockpit area including the riser and the rim (there is a lip that sits above the cockpit opening about an inch which allows you to attach a spray skirt and also keeps the water out when not using the skirt). I'm still thinking about plywood - I think mahogany/luan might look OK with the cedar, and I think in the end it would be lighter, maybe stronger, and easier. (I just called around & I can get a 4x8 sheet of 1/8" ribbon mahogany for $19 - I think I'm sold but I'll have to see what it looks like and how flexible it is). Once the recessed area is finished, sanded and all the gaps filled (filled for two reasons - aesthetics and so that they don't just fill with plain epoxy during glassing which would add weight) I'll fiberglass the deck then flip it over to work on the bottom. I already had it flipped over and was working on the stems and have the bottom half smoothed, but the deck flexed a lot because it wasn't being properly supported and I think it would be better to have the deck strengthened with fiberglass before I flip it over again. Either that or I have to make some cradles to better support the deck while it's upside down (my cradles are shaped to fit the bottom - probably just the webbing slings of my boat stands will work too without creating pressure points). By spring I should have a boat that floats but doing the finish work will take some time too (seat, back rest, hip padding, deck lines, varnish).
So here is what I have yet to do in approximate order, though that may change:
- Fill in the cockpit recess whether with strips or plywood.
- Fill the gaps in the deck.
- Cut a 4" hole in the deck in front of the cockpit and insert a hand-carved feature piece inlay (which is almost complete but isn't quite there yet).
- Seal the deck with epoxy (might be done shortly before fiberglassing).
- Fiberglass the deck top with 4 ounce glass.
- Flip the boat over into the boat stands with webbing.
- Bend strips of walnut to form the the keel strips & glue in place. (I've already got the strips cut and bent using a heat gun, but I have to decided if they are good enough)
- Plane, scrape, sand the bottom and fair the keel strips into the hull.
- Fill the gaps.
- Precoat then fiberglass the bottom (multiple layers).
- Flip the boat back over.
- Cut out the cockpit opening.
- Build the cockpit riser (short strips of cedar or a piece of plywood)
- Fiberglass the riser.
- Build a cockpit lip (by laminating thin strips of hardwood or cutting the lip out of plywood), trim the riser above the lip and smooth the edges.
- Fiberglass the lip.
- Pull the deck and hull off of the forms.
- Scrape, plane and sand the inside of the kayak fair.
- Fiberglass the inside, reinforcing certain areas.
- Cut hatch openings.
- Install fittings for deck lines.
- Attach the two halves.
- Install bulkheads.
- Apply the epoxy fill coats to fill the weave of the fabric.
- Varnish
- Build and install seat, back rest.
- Install deck lines.
- Paddle.
Wow, maybe I shouldn't have started that list. I was feeling OK with the progress but now I'm overwhelmed with what remains.
 Stern to bow shot:
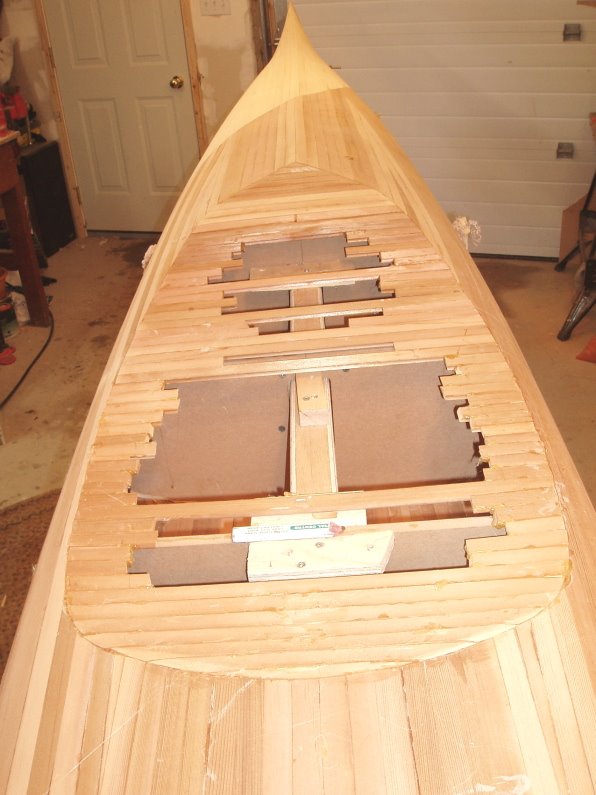

 The above photo shows how the recessed area lowers the final cockpit position, especially on the rear deck.
 That's it the deck is practically finished right??....... (stay tuned to see what's in store next)